Decoding Japan’s Transport Network: A First Timer’s Guide
(how to get around without losing your mind or your wallet)
If you’re planning a trip to Japan, or are currently in Japan, you’re probably a little overwhelmed by the transport system. It’s one of the best in the world for a reason but it takes a lot to run as smoothly as it does, which means it takes a lot for us to understand how it works.
This is the guide I wish I’d had when I was travelling Japan. To keep it simple though, my advice would be: book online for any shinkansens, pay for any metro/local trains with an IC card (set this up via your wallet app if you have an iPhone, otherwise grab a Welcome Suica pass), and if you’re getting on a “limited express” train, you’ll need an extra ticket so buy it online or at the station’s ticket machines.
PRO TIPS:
All of the train lines are colour coded so the stations have lines in those colours to direct you to the right platform.
When you get on your train, click ‘start’ in Google Maps and it will track your journey in real time, including notifying you when your next stop is close so you don’t miss it!
Trains are very timely in Japan so if you’re early and a train comes, it might be for a different train - make sure you double check.
Navigating with your phone is a huge battery drain so make sure you come prepared with charged battery packs.
If you need an elevator, select ‘wheelchair accessible’ in the route options to be directed to elevators in the station.
Google Maps will tell you which exit of the station to take for the fastest route to your end destination (e.g. ‘exit via the West exit’). However, the signs aren’t always visible so I just figured out the direction based on the GPS locator and followed that.
Downloading offline maps. It’s always a life-saver.
You can filter between ‘best route’ and ‘fewest transfers’. Play with these to see your best options depending on your timing and budget.
Transport Explained
The most common way to get around Japan is by train. Buses and trams are also available but they are generally for local transport and reaching specific destinations like temples and shrines which aren’t directly connected to train lines. They’re not really for intercity travel.
When you’re navigating Japan’s train system, think of it as:
train lines (the route or network), and
train services (the actual trains that run on those lines). In Japan, the ‘service’ refers to the speed of the train.
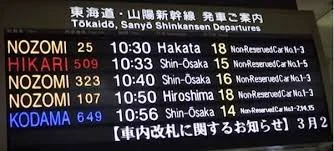
Shinkansens services have names which tell you how fast they are. For example, the Tokaido Shinkansen line has 3 services:
Nozomi (fastest, similar to limited express services),
Hikari (semi-fast, similar to express/rapid services), and
Kodama (stops at every station, similar to local services).
For all other trains, the services are referred to as:
limited express (fastest),
express / rapid (semi-fast), and
local (stops at every station).
What do the icons for Japan’s trains mean?
Japan’s train systems use different symbols and colors to show the type of service and which company operates it.
I’ve created a simple key below to help you make sense of it on Google Maps—and to show you the different ways to pay for your train travel.
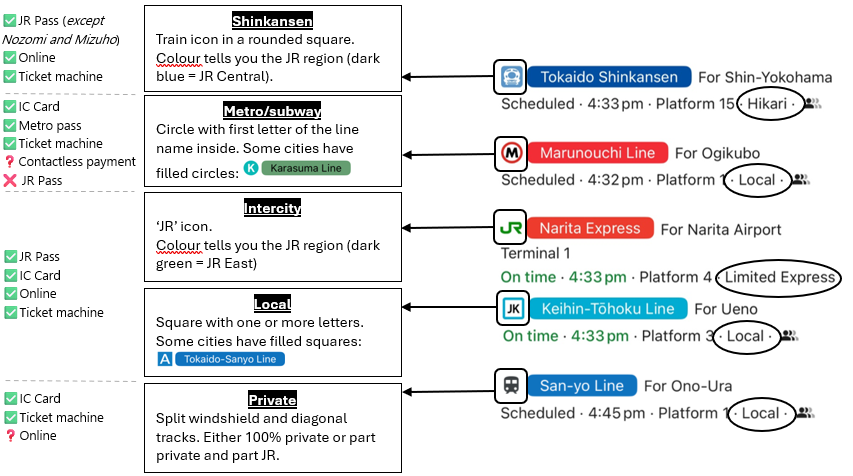

Credit: JRpass.com
Think of Japan’s transport network as basically Japan Rail (JR) and everyone else.
The JR network covers the entire country, but is divided into 6 regions as shown on the map.
PRO TIP: Keep this in mind if you buy a JR Pass because you’ll need one that’s specific to the region you’re travelling otherwise your pass won’t be valid (unless you buy a national pass which covers all JR regions). More on JR Passes further down…
Each JR region has different peak travel times or maintenance schedules, so checking ahead can save you time and stress. Click the logos below to go straight to each JR region’s official website for these updates on peak times, service changes.
JR-HOKKAIDO
JR-EAST
JR-CENTRAL
JR-WEST
JR-SHIKOKU
JR-KYUSHU
Types of trains
Shinkansens
The shinkansens (新幹線) are by far the most popular option for long distance travel. They’re comfortable, super reliable and very efficient.

Credit: The Invisible Traveller
Ticketing
✅ JR Pass (as long as your pass covers the region, or you have a national pass). The Nozomi service (Tokaido Shinkansen line) and Mizuho service (Sanyo and Kyushu Shinkansen lines) aren’t covered by the JR Pass so you’ll need to buy seperate tickets or use the other services on those lines.
✅ Online. If you’re not using a JR Pass, I’d recommend buying your tickets this way as you’ll skip any queues, you can move to a later train if you haven’t scanned your ticket, and I’ve had friends refunded part of their ticket because the train left 45 seconds late …
✅ Ticket machines in the station (you may end up queuing during peak seasons). There’s a helpful guide on how to purchase physical shinkansen tickets here.
When using a shinkansen, you’ll pay:
Base Fare (included): Standard fare based on distance.
Shinkansen Supplement (included): Extra charge for using the bullet train, also distance-based.
Seat reservation fee: ¥330–¥930 depending on the day (free if you have a JR Pass), with an added fee (up to ¥1060) for reserved seats on premium trains like Nozomi and Hayabusa.
Green Car fee (extra): Additional charge for first-class (Green Car) seating, which varies between 800 .
Seating - reserved v non-reserved
Most Shinkansen trains have both reserved and non-reserved seats.
With a JR Pass, seat reservations are free and can be made from one month before travel up until just before departure. Without a pass, it costs ¥330–¥930 extra, and up to ¥1,060 more for premium trains like the Nozomi or Hayabusa.
If you don’t reserve a seat, you’ll need to use the non-reserved cars, which are first come, first served. These car numbers vary by train, so check the screens at the station or signs on the platform to see where to line up.
Q: Is it worth reserving a shinkansen seat?
A: I travelled during June around Tokyo-Osaka-Kyoto both solo and with friends. I didn’t reserve any seating when I travelled solo and most of the time I was able to get a window seat to myself but on a few shinkansens and JR operated intercity trains, I did have to stand until people got off at the next stop (which was up to 45 minutes away).
If you’re travelling as a group and want to sit together then yes, I’d definitely recommend reserving seats as it will be much harder to come buy a group of free seats together.
NOTE: Some trains only have reserved seating:
Hayabusa, Hayate, Komachi and Tsubasa trains on the Tohoku Shinkansen and Hokkaido Shinkansen lines
Kagayaki trains on the Hokuriku Shinkansen
Nozomi trains along the Tokaido/Sanyo Shinkansen during the New Year (26 Dec - 4 Jan 2025), Golden Week (29 Apr - 5 May 2025) and Obon holidays (8 Aug - 17 Aug 2025). Exact dates will vary year to year so if you’re travelling around these periods, double check the JR website.
All seats in Green Cars.
Each of the shinkansen services also has its own colour. Since not all shinkansen carriages line up the same on the platforms, make sure you know your shinkansen service colour so you can check the right carriage numbers on the platform. For example, if you were catching the Nozomi train (displayed in yellow on the screen), then you’d be checking the train diagram in the yellow box on the right.
Credit: Japan Rail Pass

Credit: Dreamstime.com
Seat classes
There’s 3 tiers of classes on the shinkansen:
Ordinary - the most basic seating option, with rows generally in 3+2 arrangements. Still very comfortable with a good amount of leg room, a tray table, slightly reclining seats and power outlets.
Green (or 'first class’) - more plush seating, with rows generally in 2+2 arrangements. Seats are larger with more coushining and leg room.
Gran (even better than Green) - the most plush and comfortable seats, with rows generally in 2+2 arrangements. Only available on the Tohoku Shinkansen, Hokuriku Shinkansen, Joetsu Shinkansen and Hokkaido Shinkansen.
Prices for green or gran class vary depending on the distance so make sure you check the JR website for accurate pricing.
Luggage
When travelling by Shinkansen, you’re allowed to bring luggage on board, but there are some important size limits to be aware of. Bags with a combined height, width, and depth of over 160 cm and up to 250 cm (typically large suitcases) require a seat reservation with oversized luggage space, which you can make for free when booking your ticket. Luggage under 160 cm (like carry-on suitcases or backpacks) can be stored in the overhead racks or at your seat. Each passenger is allowed up to two pieces of luggage, plus a small personal item. If you're travelling with bulkier items, booking in advance is essential, as there are limited spots available.
Intercity JR lines

These are for JR operated trains or other forms of transport (for example, there’s one JR operated ferry to/from Miyajima but the rest are privately owned).
In terms of trains, these generally cover limited express and express services but you might see a few rapid or even local services offered on these lines. They’re more affordable than shinkansens because they’re a little slower but still a very efficient and scenic way to travel.
You can pay for these trains with:
✅ JR Pass (remember there’s some private lines which the JR Pass won’t cover).
✅ Online (for limited express services only).
✅ IC Cards.
✅ Ticket machines in the station (you may end up queuing during peak seasons).
Metro/Subways

Tokyo Metro line icons
Each metro line is colour coded and represented by a letter inside a colored circle. For example, the Tokyo Metro Ginza Line is marked with a gold circle and the letter “G” inside.
Every station along that line is numbered sequentially, such as G09 for the ninth station on the Ginza Line. This system makes navigating incredibly easy—even if you can’t read Japanese or your phone dies, just remembering the line letter and station number can help you find your way with minimal stress.
You can pay for these trains with:
✅ IC Cards.
✅ Ticket machines in the station (you may end up queuing during peak seasons).
❓ Bank cards. In some major cities, you can use your bank card to pay. Just tap in and out at the station like you would with an IC Card.
❌ JR Passes aren’t accepted on metro/subway lines, these are operated by the city’s council/municipal.
PRO TIP: These trains generally stop running at midnight, and start up again around 5/5.30am so make sure you’ve planned your way home to avoid getting stuck.
Local JR lines

Tokyo local line icons
Local trains are the most common way to get around smaller towns and between nearby cities. They usually stop at every station on the line and are slower than express or shinkansen services—but they’re perfect for short distances or scenic journeys off the beaten path.
You won’t see a letter and number system like on the metro, but stations and platforms are clearly signed in Japanese and English, and trains often have electronic displays showing the next stop.
You can pay for these trains with:
✅ IC Cards.
✅ Ticket machines in the station (you may end up queuing during peak seasons).
❓ JR Passes (only for local lines operate by Japan Rail).
PRO TIP: Local trains tend to run less frequently in rural areas, especially in the evening, so check the timetable in advance to avoid long waits.
Private lines
Private lines are operated by companies outside the Japan Rail (JR) Group. You’ll find them mostly around big cities like Tokyo, Osaka, and Kyoto, where they often run direct routes between suburbs and major commercial hubs. They also service popular tourist spots like Mt. Fuji or Nikko.
These trains are known for being clean, reliable, and sometimes surprisingly luxurious (we’re looking at you, Tobu’s Revaty and Odakyu’s Romancecar). They often offer faster, more direct service than local JR trains - especially if you're headed somewhere slightly off the main tourist track.
If you’re taking a limited express service on a private railway, you’ll need to buy a separate seat reservation or limited express ticket in addition to your base fare. For example, if you're taking the Odakyu Romancecar, you’ll tap your IC Card or buy a regular ticket for the base fare and buy a Romancecar ticket (reserved seat + surcharge) either at a machine, the counter, or online in advance.
You can pay for these trains with:
✅ IC Cards.
✅ Ticket machines in the station (look for signs like “Limited Express Tickets” or the line’s name).
❓Online. Some companies like Odakyu, Tobu, and Kintetsu offer online reservations for routes to places like Hakone, Nikko, or Nara. They may also allow you to book both the base fare and any required limited express ticket at the same time.
❌ JR Passes aren’t accepted on private lines.

PRO TIPS:
If you’re planning to use a private line frequently (like Keio, Odakyu, or Hankyu), it’s worth checking if they offer their own discount passes for tourists.
You can tell whether a train is operated by JR or a private company by scrolling to the bottom of your route in Google Maps and selecting “Agency info”. If your route has multiple trains, tap the line name, and then any of the times that appear, and the operator will appear at the bottom.
Transport cards
JR Pass
If you’re planning any type of train travel around Japan, you’ve probably heard of the JR Pass. It gives you unlimited travel on all shinkansens (other than Nozomi and Mihozu), most intercity trains, local trains, and some buses and ferries for 7, 14, or 21 consecutive days. It’s available only to foreign tourists entering Japan on a temporary visitor visa.
If you’re not sure whether your route is covered by Japan Rail, you can check the JR Pass map.
❌ Cons of the JR Pass
It’s expensive, especially after it had a 77% increase in 2023.
Doesn’t cover Nozomi or Mizuho Shinkansen — the fastest (and most convenient) services on some major routes. You’ll need to buy seperate tickets.
Only works on JR lines, so you’ll still need an IC card (like Suica or Pasmo) for subways and non-JR trains.
If you’re just sticking to one region or moving slowly, it might cost more than it saves.
✅ Pros of the JR Pass
Unlimited travel on JR trains — ride as much as you want without thinking about ticket prices.
Free seat reservations on shinkansens (highly recommended during busy seasons).
Convenient — skip the ticket machines and just show your pass at the gate.
Also works on the JR ferry to Miyajima and some JR buses.
Bonus discounts to museums, galleries, hotels, attractions and restaurants - see here.
Is the JR Pass worth it?
Once you know which cities you’ll be visiting, you can use JR Pass calculators like Navitime or JRPass.com to compare the cost of buying tickets on the go versus the cost of a JR Pass:
| JR Pass Duration | Ordinary | Green (1st Class) |
|---|---|---|
| 7-Day | ¥50,000 | ¥70,000 |
| 14-Day | ¥80,000 | ¥110,000 |
| 21-Day | ¥100,000 | ¥140,000 |
PRO TIP: Fare calculators (like Google Maps or JR Pass calculators) are a good starting point, but they’re not always accurate. For the best estimate, check prices directly on JR websites and add a buffer for local train trips.
When I did my calculations, it told me the difference would be around ¥2500-¥5000 so I didn’t get a JR Pass. In reality, the estimates for my trips were lower than the actual cost and I spent quite a bit on the local trains to go exploring which ranges from ¥150-¥300 or even up to ¥910 for a multi-leg excursion, which adds up over a while.
Where to buy a JR Pass?
You can’t buy a JR Pass directly online. You need to buy a JR Pass voucher which you use to pick up the physical JR Pass once you’re in Japan.
You can order these vouchers online but make sure it’s from a legitimate reseller. The safest places to order from are:
JR Group (the official site for the Japan Rail Pass)
Klook (authorised travel agent)
Japan Experience (official JR Pass partner)
Once you’ve placed your order, make sure you keep the voucher safe! You’ll need to show it when you collect your JR Pass.
How to exchange a JR Pass voucher?
Go to a JR Exchange Office (they're in all major airports and stations).
📍 Common exchange points: Narita, Haneda, Kansai airports / Tokyo, Kyoto, Osaka, Shin-Osaka stations.
Bring:
Your passport (with a temporary visitor stamp)
Your Exchange Order
Choose the start date (can be up to 30 days later).
They’ll hand you a new JR Pass and you can start exploring!
Can I buy my JR Pass in Japan?
No, you haven’t been able to buy a JR Pass in Japan since October 2023.
PRO TIPS:
Reserve your long-distance trains early, especially in busy seasons.
Plan your most expensive travel days for the pass period.
Bring your passport whenever you use the pass — JR staff may ask for it.
Use an IC Card alongside the JR Pass for non-JR travel in cities.
IC Card
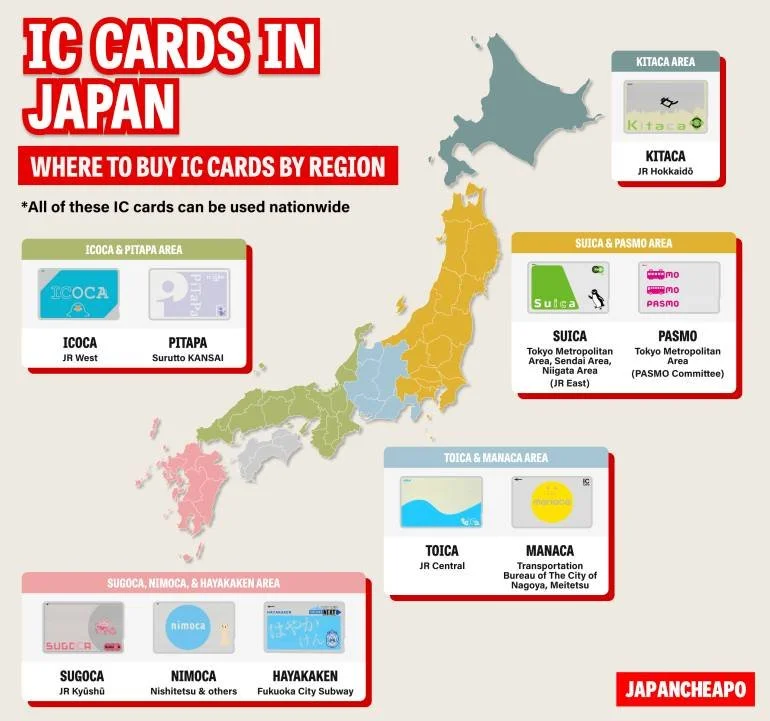
Credit: Tokyo Cheapo
IC Cards can be loaded with prepaid credit and make getting around Japan a lot easier. Instead of lining up to buy tickets for every ride, you just tap in and out at the ticket gates, and the correct fare is automatically deducted when you exit. It also means you have more flexibility to change your plans on the go because you didn’t purchase a ticket with a specific starting point or destination.
There are several different IC Cards and the only real difference is which company issues the card and where you buy them. The top 10 major IC Cards are fully interchangeable across Japan, so once you’ve got one, it’ll work on trains, buses and trams.
PRO TIPS: IC Cards are also accepted as a form of payment at convenience stores and vending machines so you can use it to pay for your 7/11 snacks.
Where to buy an IC Card?
Depending on how long you’re staying and the type of phone you use, there’s a few options:
📱 Option 1: Add a Digital IC Card to Your iPhone

If you’re an iPhone user, you add a digital card directly in your Apple Wallet. Just open the Apple Wallet app, tap the “+” button, select “Transit Card”, and choose one of the Japanese IC cards. My advice would be to just select the Suica. It’s the most widely accepted and easiest to manage.
You can then top up directly from your phone using Apple Pay. Super convenient for travelling, and great if you want to avoid carrying an extra card.
⚠️ Note for Android users: Digital IC cards can only be added if your phone was purchased in Japan. If that’s not you, you’ll need to buy a physical IC Card.
🎟️ Option 2: Buy a Welcome Suica at a station

If you're an Android user and visiting Japan for less than a month, your best option is a Welcome Suica. It works just like regular Suica but there’s no deposit required. The catch is it only lasts for 28 days.
You can buy a Welcome Suica at JR East Travel Service Centers (e.g. Narita, Haneda, Tokyo Station). If you have an iPhone, you can download the Welcome Suica app but I’d suggest skipping this and just adding the standard Suica to your Apple Wallet since it also doesn’t need a deposit and doesn’t expire.
❌ Cons
Card expires after 28 days—no extensions.
It can’t be reissued if lost or stolen.
Unused balance is not refundable, so try to use it up before you leave.
NOTE: You’ll need to show your passport when purchasing, as the card is only for foreign tourists on a temporary visa.
✅ Pros
No deposit: You don’t need to pay the usual ¥500 deposit like you do with regular IC cards.
Works nationwide: Even though they’re issued in Tokyo, you can use them almost anywhere IC cards are accepted.
Payment method: It can also be used to pay at convenience stores and vending machines.
The Pasmo Passport was discontinued in August 2024. Until November 2025, you can purchase a Kansai One Pass. This is the closest equivalent to a tourist IC Card outside Tokyo. It’s basically a standard ICOCA card bundled with tourist discounts (e.g. Osaka Castle, Kyoto buses, etc.). You pay the regular ¥500 deposit and can use it across Japan just like other IC cards.
🎫 Option 3: Buy a physical IC Card at a station
If you’re staying longer than a month, or you’re arriving somewhere other than Tokyo, your best option is to pick up a regular physical IC Card at:
Major train stations (look for JR or private railway counters)
Airport stations (Narita, Haneda, or Kansai)
Ticket machines with IC card logos (many have English options).
Most IC cards require a ¥500 refundable deposit, which you’ll get back when returning the card. For Suica cards, there’s a ¥220 handling fee when returning the card, but it’s only deducted from any leftover balance and not your deposit.
PRO TIP: Spend your remaining balance down to less than ¥220 before you return the card and you won’t pay the fee at all. This is your encouragement to grab some last minute snacks at 7-Eleven! You’ll still get the ¥500 deposit back.